-->

Thursday, March 31, 2011

Favorite Things Friday - No. 17

What up, peeps?  Welcome to the 17th FTF.  

Earlier this week, I decided to utilize my blog pages and corral all of my trash-to treasure posts in one spot.  There are 27 total.  You can check those out by clicking here.

I added another page for all of the projects that didn't have their own post.  There are 60 of these and most of them have never been shown on this blog.  You can find those here.


There were so many great links last week.  Here are a few of my favorite.

Check out these awesome embroidery thread eggs that Lucy from Craftberry Bush made.  These are just so AWESOME!  I'm having an egg decorating party with two friends next week and I think these are going to be added to the list.  I just love how colorful they are.  be sure to go over and check out all of the wonderful photos she posted.


I love the finish on this made over knife block by Natalie over at Johnny in a Dress.


I love this outdoor dining set-up that Jaime @ Okla-HOME-a shared, that I told Charles it's exactly what I want us to do in our backyard.  There's now a photo of this in my design files.  Thanks for sharing this, Jaime!


Thanks to everyone who linked up!  If I "faved" you, feel free to grab a button from the sidebar.


Now it's your turn!  What are some of your favorite things?

Rules:There's really only one.  Please, please, please link back to the party so that others can join in.  Also, it'd be really nice of you if you could visit a few of the other linkups and leave a nice comment.


Monday, March 28, 2011

Beachy Bath Tray


This is the 2nd one of these that I've thrifted.  


The first one became a fruit bowl which I'd painted in a light yellow and then glazed.

I say it was a fruit bowl because that's how I staged my Etsy photo.  Whoever bought it could be using it for anything.  

I staged this one as a kind of toiletry tray with a beach theme, using a Martha Stewart paint sample called Sea Glass.  It's one of the premixed MS samples that you can get at Home Depot for around $3.  Those paint samples are great for doing small makeovers.  A little goes a long way and it's actually cheaper than using craft paints.  I still use some of my favorite craft paint colors, but I've basically switched over to wall paint samples.

Anyway, I gave this a few coats of paint and then distressed it.  I staged it with hand-knit washcloths, some bath salts I had lying around and a starfish from my bathroom.  LOVE!
 

I've got so many accessories that I want to use in my beachy bathroom makeover, it's gonna be so hard to choose what to keep.  I've decided to sell this one for now.  It can be found here, in my shop.


Linking to:
Get Your Craft On @ Today's Creative Blog
Anti-Procrastination Tues @ New Nostalgia 
Twice Owned Tues @ House of Grace
Trash to Treasure @ Sassy Sites  
Wow Us Weds @ Savvy Southern Style 
Power of Paint Part @ Domestically Speaking 
Strut Your Stuff @ Somewhat Simple 
Under $100 Linky Party @ Beyond the Picket Fence
Transformation Thurs @ The Shabby Chic Cottage 
Hookin' Up With HOH @ House of Hepworths 
Feature Yourself Friday @ Fingerprints on the Fridge 
Frugal Friday @ The Shabby Nest 
Crafty Soiree @ Yesterday on Tuesday  

Friday, March 25, 2011

Favorite Things Friday - No. 16

Howdy!  Welcome to the 16th FTF.

An obvious favorite of mine this week is my bedroom makeover.  If you missed the post and want to read about it, go here.

I've been bitten by the beach bug and it shows with the newest pieces in my Etsy shop. Here is one before & after.  It seems that I don't always take before photos.  BOO!
If interested, this Beach Cottage cubby shelf is for sale here.

The paint I used was a Behr sample color-match mistint from Home Depot so there is no color name.  I have a similar gray that I've used on numerous items.  It's a Martha Stewart color called Driftwood Gray.  The code for it is MSL265.  It's also from Home Depot.  The only reason I didn't use it for this project is because I didn't have enough left to be able to paint the whole thing.

Here are a few of my other new beachy shop items.


One more quick favorite.  I've got Amazon Associates (which I don't really use as often as I should) over on the right of this screen and I keep seeing this CD, which I bought earlier this week.  It is FANTASTIC so I figured I should share it.  It's kind of soulish and bluesy.  She reminds me of Amy Winehouse and Fiona Apple. Even Han loves her!


Alright, now I need to feature some links from last week's party.

I'm pretty sure you've seen this mirror featured around blogland lately.  One of my favorite bloggers (she's super creative), Bev, from Flamingo Toes shows you how to make one of these awesome starburst mirrors using silverware.   GO, BEV!!


You have to go over to The Decorative Paintbrush and read the post on how Mary and her business partner, Maggie stenciled a client's stairs.  Yes, this was done with stencils, people!  Amazing!


Well, that makes two!
 
Thanks to everyone who linked up!  If I "faved" you, feel free to grab a button from the sidebar.


Now it's your turn!  What are some of your favorite things?

Rules:There's really only one.  Please, please, please link back to the party so that others can join in.  Also, it'd be really nice of you if you could visit a few of the other linkups and leave a nice comment.


Thursday, March 24, 2011

Well It's About Time - My Master Bedroom Makeover

It's finished!!  I stared this makeover back in November.  It was something  that should have only taken a week, at most, but then life got in the way.  Thanksgiving got in the way.  Christmas got in the way.  Etsy got in the way.  And then I was over the bedroom makeover.  At least until a couple of weeks ago. I finally put the finishing touches on it and now it's FINISHED!  The most un-girliest girl has a girly room!


This is what the room looked like when we moved in.  It was horribly dark and there was some seriously tacky border going on.


A few years ago, I painted the room white.  I went with white because I've always loved switching my bedding out and I figured that would be easier with white walls.  The funny thing about that is that ever since the walls were painted white, we'd been using a white down comforter.  Charles and I could never agree on bedding and it was just easier to stick with white.

Here are some before photos taken after I'd started clearing things out for the makeover.
 boring

 sad worn-out carpet

 ginormous TV

horrible mirrored closet door


The first thing we Charles did was rip out the carpet and put down laminate.  We used the same flooring that we'd put down in Han's room.  After that was finished, we hemmed and hawed over paint color.  I wanted light blue.  Charles didn't.  I ended up showing him so many paint colors over the course of two weeks that he finally told me he didn't care what color I used.  So I used light blue (my evil plan worked!).  Alaskan Husky from Benjamin Moore, to be exact. 
the chair


As usual, Charles and I went back and forth over bedding too.  I asked for your advice on bedding in a past post.  This one was my favorite.  
 image courtesy of Pottery Barn


Charles hated it.  Again, I showed him so many different comforters, duvets and quilts that he finally told me he didn't care what I picked.  I went to my local PB and was told they didn't carry this particular set in the store and I would need to order it.  I really didn't want to order something like this without being able to see it first so I checked the closest PB outlet to see if maybe they had some.  They didn't.  On the way home from the outlet, I stopped by Target and fell in love with this set from the Simply Shabby Chic line by Rachel Ashwell.  It was way cheaper than the PB set so I got some of the coordinating throw pillows too.


While I was looking through my PB catalog for bedding, I fell in love with this over-the-bed shelf set-up they have goin' on.


I ended up paint my existing shelf with some leftover trim paint and then attacking it with a sander.  This is a temporary fix until Charles build a replica of the PB shelf.  I filled my shelf with vintage books and two small thrifted bird cages. 


My bedside tables got makeovers too.


I finished up by hanging some thrifted white plates on both sides of the dresser and then added a thrifted birdcage and some other accessories to the top.
thrifted tin bucket thingy with Hob Lob 50% flowers


Next up is Han's bathroom.  Yes, we're changing it up again.


Linking to:
Friday's Unfolded @ Stuff & Nonsense
Everything but the Kitchen Sink @ A Little Knick Knack 
Fab Friday @ Frugal & Fabulous Design 
Friday Flair @ Whipperberry 
Sunday Showcase @ Under the Table & Dreaming 
Craft-O-Maniac Linky Party
Just Something I Whipped Up @ The Girl Creative   
Making Mondays Marvelous @ C.R.A.F.T. 
Get Your Craft On @ Today's Creative Blog
Anti-Procrastination Tues @ New Nostalgia
Wow Us Weds @ Savvy Southern Style 
Hookin' Up With HOH @ House of Hepworths 

Thursday, March 17, 2011

Favorite Things Friday - No. 15

It's been a good week (except for the fact that I lost my THE diamond ring yesterday).  I feel like I've got my mojo back.  I've gotten back into my Kick the Clutter 2011 thing (no posts yet, though).  I've picked back up on painting things for my shop and I've got a lot of project ideas for this here blog.  There must just be something about Spring because I have felt such a creative rush since last Spring.  I've got a few favorite things of my own to share this week and then I'll move on to my favorite links from last week.

First up is this urn makeover I just finished. 
I bought the urn for a buck-twenty-five last week at the Salvation Army.  I don't usually spray paint stuff anymore, but there was NOOOOO way I was going to paint this thing by hand.  I wanted a really smooth finish so I opted for spray paint.  I'll just have you know that in the year I've been doing my thang, I have never been able to find Rustoleum's Heriloom White spray paint.... until now.  Anyway, I gave it a couple of coats of that and then I used my trusty Valspar Antiquing Glaze (see my glazing tutorial here).  It turned out so much more beautiful that I'd imagined it would.  This just shows you how far a little paint and glaze will go. 


My other fave this week is the PBS miniseries, Frontier House.  This show premiered back in 2002.  I remember watching a few episodes back then and thinking it was a great concept.  Reality TV at it's best.  I recently added the series to my Netflix queue (not instant) and spent most of today watching the first disc. 


Here's the premise from Wikipedia:
Frontier House was an educational reality TV series that originally aired on PBS in April 2002. The show, which was filmed over the course of five months, followed the lives of three family groups that agreed to live as homesteaders did on the American frontier in 1883. Each family was given a 160-acre plot of land and an allotment of food, supplies, and livestock. They were expected to establish a homestead and complete the tasks necessary to prepare for the harsh Montana winter. At the end of season, before winter struck, each family was judged by a panel of frontier experts and historians, and the likelihood of survival for each group was assessed.

This is a great show and anyone who is a fan of reality TV and history, especially those of us who have romanticized this period of time and how simple times were, how wonderful it would have been to be a homemaker during this time, will love it.  It will make you happy for the modern day conveniences you have. 


Now it's time for two of my faves from last week.

I love this toile bench makeover that Sharon from Elizabeth & Co linked up.  Beautiful!


Michell from Girl in Air made this knockoff Tree Bookshelf out of scrap lumber.  This would be perfect for a nursery!  She's even got a tutorial for it.  Make sure you head on over and check it out.


Thanks to everyone who linked up!  If I "faved" you, feel free to grab a button from the sidebar.


Now it's your turn!  What are some of your favorite things?

Rules:There's really only one.  Please, please, please link back to the party so that others can join in.  Also, it'd be really nice of you if you could visit a few of the other linkups and leave a nice comment.


Linking to:
Feature Yourself Friday @ Fingerprints on the Fridge
Frugal Friday @ The Shabby Nest

Monday, March 14, 2011

Booted - The Little Chair That Couldn't


I'm a little embarrassed, actually. I didn't expect to fall off the first week.  Oh well.  I do want to say congrats to all of the ladies who did make it through to the next round and good luck!  I'll still be voting weekly and am already having a hard time choosing which project to vote for this week!  

To everyone else, make sure you head on over to 1 Month 2 Win It to vote!  Voting ends Weds! 

 I guess 
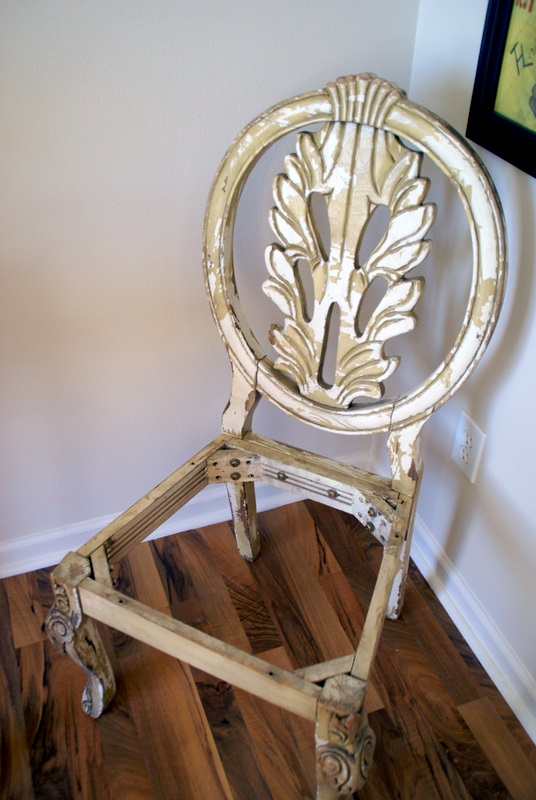
this contest wasn't the best time for me to try something out of my range of expertise.  I didn't want to do one of my typical pieces because I didn't want to make it too easy for someone to spot something of mine.  Plus, this lil' lady had been sitting around in my garage for almost a year and it was time to git-r-done.  (OMG, did I just say that???)

Sadly, the back couldn't be saved.  It looked like it was made from some sort of cardboard material and it was torn and split. 

After Charles cut the backing out, I took the chair apart and began scraping and sanding the peeling paint.

Once that was finished, The chair was put back together and then stained with my favorite stain, Minwax in Dark Walnut.  Just like I do with some of my other pieces, I just brush it on and leave it to dry.  The finish doesn't need to be all that great because I'm just gonna cover it up with paint.  I just need the stain to contrast the paint once I distress.

After that, it was time to paint and distress.  I just used some leftover trim paint we had.  It's just a white with a slight brown tint to it.

While I was stripping, staining and painting, Charles was cutting the plywood pieces needed for the back and the seat.

For the seat upholstery part, I bought a big ole' foam cushion which we cut to size and then wrapped in batting.  For the chair back, we used a few layers of batting.  I chose to match the chair fabric to the drapes in my bedroom, so I bought a matching drapery panel and cut it up.

Charles put everything together.

And we had a chair.  The after photo I chose to submit wasn't the greatest.  It was taken in my dining room and I have to say that the chair looks so much better in the bedroom.  I didn't want to post a photo of it in there because I'd been thinking I would do my bedroom reveal before the 1 Month 2 Win It voting started.  I didn't want anyone to be able to figure out which one was mine.  Anyway, here she is, in her new spot, looking fabulous!


P.S.  Although the title and the intro of this post makes it seem like I think my chair sucks, I don't.  I LOVE my chair.  :-)


Linking to:
Trash to Treasury Tues @ Sassy Sites
Piece of Work Weds @ Primitive & Proper